Pages

Showing posts with label mushrooms. Show all posts

Thursday, December 1, 2011

Enchilada Lasagna

I am really excited to be sharing this recipe with you today. I have seen the idea of an enchilada lasagna around for a while, and after making some homemade tortillas, I thought, why not try it out! The tortillas that I made were not the roundest and most even looking tortillas so I thought they would fare well in this recipe.

Tortillas are actually really easy to make and taste infinitely better than most of the grocery store varieties. Not to mention the short ingredient list. Flour. Oil. Milk. Baking Powder. Salt. That's it. No glycerides, no fumaric acid or a number of other presumably preservatives. I used this recipe from the Homesick Texan. I used half whole wheat flour and they seemed to turn out well. When you make these, don't forget to have one when it is still warm and fresh. You will not regret it.

This recipe from Perry's Plate was the inspiration for using the tortillas for an enchilada lasagna, instead of making just plain old enchiladas. The recipe is totally adaptable to your taste and preferences, but this is how I did it:

Enchilada Lasagna adapted from Perry's Plate and Simply Recipes
serves 4-6

Sauce:
1 tbsp olive oil
1 medium onion
3 garlic cloves
1 cup of salsa
1 can of crushed tomatoes
3 tbsp tomato paste
1/2-1 cup of water

Tortillas (I suggest you make these; I doubled the recipe)

1 tbsp olive oil
mushrooms
red peppers
corn
black beans
spinach
shredded cheddar cheese

1. Heat olive oil on medium heat. Saute onion and garlic until cooked. Add salsa, tomatoes, tomato paste and water. Add water to make the sauce according to your desired consistency. You don't want it too thick because it will thicken up even more in the oven, but too thin will result in soggy tortillas.
2. Reduce heat to low and keep warm while preparing the lasagna.
3. Preheat oven to 425 degrees F.
4. I decided to do sautéed vegetables. In a large pan, heat olive oil over medium heat. Add all vegetables except for the spinach and beans. Once the vegetables are cooked, add the black beans and stir to combine.
5. In a large greased baking dish, add a little bit of the sauce to the bottom and spread around. Place a layer of tortilla. Add 1/2 of vegetables, top with sauce and spinach. Place a layer of tortilla, add the rest of the vegetables, add sauce and spinach. Place the final layer of tortilla, add a little bit of sauce, and sprinkle some shredded cheddar on top.
6. Bake at 450 degrees F covered with foil for 20 minutes. Remove foil and bake for another 10 minutes. Allow to sit for 5-10 minutes before cutting.


This is an amazing dish. It makes great leftovers, and is very easy to assemble. I cannot wait to make it again!

Friday, June 17, 2011

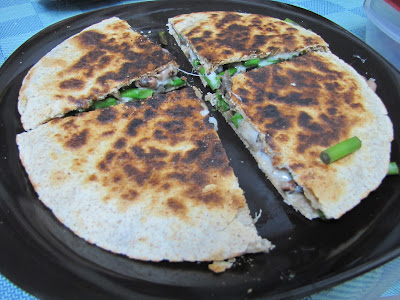
Asparagus and Mushroom Quesadillas

For the past while I have been baking my own bread. I have yet to perfect it however, and have not been able to slice any of my homemade bread into slices good enough for a sandwich, for example. The bread I have been baking is an oatmeal molasses bread from Good to the Grain. The bread is delicious, and I am perfectly fine eating a jagged chunk of bread (with peanut butter of course) until I perfect the kneading, rolling, rising, and folding process to make a perfect loaf of bread. This has inspired me to try and bake my own bread from now on though. I want to try making all of my favourite baked goods like bagels, english muffins, and tortillas. Since my last stint with making chickpea tortillas did not go so well, I was discouraged and purchased some tortillas at the market on the weekend. Tortillas are notorious for having the longest ingredient list of all, but these ones were the lesser of many evils.

I had many options for ways to use these tortillas. I opted to not go for my usual tortilla/pb/banana sandwich, which is my favourite combination ever, and made quesadillas. Believe it or not, I had never made this really easy meal before. I actually really like quesadillas, so I have no idea why I had not attempted this in the past. This isn't your typical quesadilla as I used ingredients I had on hand, but it was a winning combination.

Asparagus and Mushroom Quesadillas
Serves 2 (meal), or 4 (with a side)

8 white mushrooms, chopped finely
asparagus, chopped to 1-2 cm in length, enough that is about equal to that of the mushrooms in volume
1/2 cup pinto beans
2 green onion
4 tortillas
2/3 cup shredded mozzarella cheese
4 tsp hot sauce
salsa and sour cream to serve with

1. Sautee the mushrooms on a dry pan over medium heat.
2. Once they begin to soften, add the asparagus, and sauté until cooked. Remove from heat.
3. In the same pan, place tortilla on pan, add half of asparagus mushroom mixture, half the green onions, 1/4 cup pinto beans, half the hot sauce, and half the cheese.
4. Place second tortilla on top and press down to anneal the quesadilla. Heat until cheese is melting, and bottom tortilla is crispy. About 3-6 minutes.
5. Flip and cook for another few minutes until tortilla is crispy and all cheese is melted.
6. Repeat with the other half of the ingredients.


These were really good, especially with some good salsa and sour cream. I will definitely have to make quesadillas more often. I think I might wait until I land on a successful tortilla recipe. In the meantime, I am still plugging away in the kitchen finding a perfect recipe to use chickpea flour for. I almost found it yesterday. Let's hope it isn't too long before I can share something with you.

Wednesday, March 9, 2011

Mushroom, Tomato, and Chickpea Barley Risotto

Some food for thought: The USA wastes 40% of all food produced in a year. I am guessing the picture isn't much better in Canada. About half of this can be attributed to household waste. In today's world we have an obesity epidemic and massive food waste on one side of the planet and an undernourished population with food scarcity on the other side. Although reducing our food waste won't immediately solve the world's food problems, it will at least save us some money.

Being the food safety freak that I am, I no doubt waste a lot of food. I won't leave leftovers in the fridge for more than a few days and if I forget to freeze it, there it goes into the green bin. I like to be on the safe side. This goes for produce as well. Sometimes I don't use up all the fresh vegetables I have bought before they wilt away. In the spirit of Lent and self-improvement I think I will try and consciously waste less food. This recipe is an example of an attempt to waste-not. I had celery from last week that was wilted, not fit for direct consumption, but would work beautifully cooked up. The mushrooms were getting to the end of their life-time as well. So instead of making the clam pasta that I have been dying to make all week, I made this barley "risotto" inspired by an Oh She Glows recipe, and my withering vegetables.

Mushroom, Tomato, and Chickpea Barley Risotto

1 tbsp olive oil
1 small stalk of celery, chopped finely
13 white mushrooms, chopped
1/2 tsp basil
1/2 tsp oregnao
1 cup pot barley
2 3/4 cup tomato soup (I used Imagine's Creamy Garden Tomato Soup)
3/4 cup water*
1 1/2 cup cooked chickpeas

1. Heat olive oil over medium heat. Add celery an saute for 3 minutes.
2. Add mushrooms, basil and oregano and cook until mushrooms begin to soften (about 3-5 min).
3. Add barley and stir for 3 minutes until hot.
4. Add soup, water and chickpeas and bring to a boil.
5. Reduce heat to a simmer and cover. Allow to simmer for about 30-40 minutes, until barley is cooked.

* Depending on the thickness of the soup you use, you may need to add more water.


This is such a quick way to get a "risotto" type dish. It was very flavourful due to the fantastic soup that I used. If your soup or broth is less flavourful, pump up the seasoning. Cumin or tumeric would would wonderfully instead of basil and oregano. This was a great dish to have for dinner with the current weather: cold and rainy. I look forward to coming home to these leftovers tomorrow. I'll be sure to freeze or eat any leftovers before they get a little sketchy...

Anyone have any good tips to avoid food waste?

Thursday, February 24, 2011

Spiced Veggies and Chickpeas

I made this dish last week when all I wanted was to consume a large amount of vegetables that were packed with flavour. I added the chickpeas to add some protein to make it a little more hearty. I wish I could say I remember exactly how much of everything I added but I can't. All I know is that I knew from the get go that a basic pan would not hold all my veggies, and that a saucepan would have to be used. Turns out this was an excellent idea, as the vegetables got very soft and almost stew like, without the sauce. In this recipe I got to use a spice combination I picked up at the One of a Kind Craft Show in Toronto in December. It is called dukkah. It is great on toasted naan or pita, but also makes a nice topping to dishes such as this. By the way, I cannot wait for the next show to treat myself to another new spice/condiment. The products that you can find there are fantastic. Oh...and did I mention there are free samples...EVERYWHERE?!?


Spiced Vegetables with Chickpeas

I appologize for how rough this recipe is, but it must be flexible since I winged it and it turned out great. It is also all about your taste and how much spice you can handle. Don't like ginger? Use less or leave it out. Love garlic? Start mincing those cloves! I also kept the size of the chopped veggies fairly large which is also a matter of taste.

1.5 tbsp olive oil
1/4 tsp chili flakes
1.5 tsp cumin
red onion, chopped
cremini mushrooms, sliced
carrots, chopped
celery, chopped
brussel sprouts (cut into halves/quarters)
1 can of water chestnuts
1 small cauliflower head, chopped
1 brocolli crown, chopped
3/4 tsp tumeric
4 coves garlic, minced
1 tbsp chopped fresh ginger
1 can chickpeas
black pepper
1-2 tbsp sesame oil

1. Heat olive oil over medium-high heat with chili flakes and cumin. Once fragrant, add the onions and saute for a couple minutes.
2. Add the rest of the vegetables. Stir well for 5-10 minutes until vegetables begin to cook.
3. Add tumeric and stir well to combine.
4. Add chickpeas, garlic, ginger, and black pepper. Stir and continue to heat on medium until vegetables are soft.
5. Drizzle with some sesame oil, mix in well and remove from heat.
6. Serve with dukkah sprinkled on top.


This is a good intermediate dish between wanting the fresh salads riddled with vegetables of the summer, but still craving the warm comfort food of winter.

Friday, February 11, 2011

Brie Macaroni and Cheese

I was not a huge fan of macaroni and cheese while growing up. My brother loved it, so I ate it when it was made for me, but I would never ask for it. Of course, this was Kraft cheddar mac 'n cheese. This convenience food is often a staple for University students. Incredibly cheap, quick, and easy. For me however, I can distinctly remember the three times I ate mac 'n cheese during my undergrad. The first was in first year. I lived in a dorm-style residence with no kitchen amenities beyond a microwave and refrigerator. We managed to make Kraft dinner in a plastic container of some sorts, and it was only palatable doused in ketchup. The second two times came out of no where (about a year apart) where I had an intense craving for President's Choice white cheddar macaroni and cheese. I have not had it since, but the craving has creeped up again.

I have been wanting to make my own from scratch for quite a while, becuase I know with some real cheese it could be quite a treat. A couple weeks ago Just Flourishing mentioned brie mac 'n cheese. I knew this is how I wanted to make my first homemade macaroni and cheese. With brie! When I saw brie cheese at No Frills for a reasonable price, I picked some up and knew that it would be used to make my first ever homemade macaroni and cheese.

This recipe is really my own but I took ideas from a number of recipes. I accepted that it wouldn't be heathy, but I put some "healthier" twists on it anyway. I like the idea of adding a vegetable which came from the Kitchn. I also liked the idea of using cottage cheese to amp up the creaminess from Smitten Kitchen. In this recipe the cottage cheese was blended to blend the "curds" which tend not to melt when heated. This added some cheesyness and protein without the fat of traditional cheddar or the brie which I used. Oh, and I didn't use macaroni.

Shells with Brie Cheese and Mushroom Sauce
Serves 2-3

1 tsp butter
3 large cremini mushrooms
1 cup milk (I used skim)
1 tbsp flour (use all purpose - whole wheat results in brown specs in the sauce - see picture)
1/2 cup cottage cheese, blended smooth (I used 2%)
1/2 small wheel of brie cheese (100 g, rind removed)
2.5 cup dry vegetable shell pasta

1. Heat butter on medium heat. Add mushrooms and saute until soft. Cook pasta according to package instructions.
2. Turn heat to medium-low and add 1/2 cup milk and stir continuously while simmering.
3. Add 1/2 tbsp flour (sprinkle it), and continue to stir until sauce thickens.
4. Add blended cottage cheese and the rest of the milk. Stir until a simmer is reached.
5. Sprinkle the rest of the flour and continue to stir until the sauce thickens. Add brie cheese, cut into chunks. Simmer and stir until desired thickness.
6. Add sauce to cooked pasta.


For making the sauce on the fly, it didn't turn out too bad! It was a little thick so I think I would add another 1/4 to 1/2 cup milk next time. The problem with homemade cheese sauces is they tend not to do very well as leftovers. This is all to do with texture as they become clumpy rather than saucy. The taste does not change though so all is not lost.

I recommend you make this recipe if you are looking for a protein packed (15 g per 1/2 cup) slightly healthier 'real' mac 'n cheese, and love brie. But really, you can substitute any cheese you want for the brie to suit your taste. Making sauces can be fun as long as there is no pressure for them to turn out perfectly, so experiment! It might not look very pretty, but it will always taste good...it is cheese after all!

Sunday, January 30, 2011

Special Lamb Roast Dinner

On Friday night I made quite the dinner. I began the process at around 2:00 pm. Dinner was served around 7:00 pm. It wasn't extremely labour intensive, but a lot of waiting and planning with regards to oven time. Here is what was on the menu:

Rosemary and Garlic Focaccia
Roasted Lamb in a bed of Vegetables
Spinach and Goat Cheese Salad with Balsamic Vinaigrette
Asparagus
Mint Chocolate Chip Ice Cream Sandwiches

Today I will talk about the highlight of the show, if you would call a meal a show. That would be the roasted lamb in a bed of vegetables. Upon acquiring the leg of lamb from Fortinos (1.3 kg of leg) I browsed the internet for cooking times/cooking methods. After looking at a dozen sites I settled on a protocols. It turned out really well, besides being a bit underdone for my taste.

Roasted Leg of Lamb in a Bed of Vegetables

2-3 lb leg of lamb, bone-in
1.5 lb fingerling potatoes, cut into halves or quarters
2 large shallots or small onions, cut into wedges
~20 small white mushrooms
1 can whole tomatoes, drained (liquid reserved)
~1/2 cup red wine
olive oil
rosemary
black pepper
7 garlic cloves

1. Preheat oven to 400 degrees F.
2. Place potatoes, onions, mushrooms and drained tomatoes in a large roasting pan.
3. Drizzle some olive oil, add rosemary, ground black pepper and toss to coat, breaking up whole tomatoes.
4. Place lamb on top of vegetables with the fat side up. With a sharp knife make cuts in the meat faced up. Pour the juice from the can of tomatoes on top, followed by the red wine. Sprinkle with black pepper and rosemary. Place 3 garlic cloves on top of lamb and 4 in the vegetables.


5. Heat lamb in oven for 30 minutes. Remove garlic cloves on top of lamb and stir vegetables.
6. Reduce heat to 350 degrees F and roast until internal temperature is 170 degrees F (well done, about 35 minutes per pound). Stir vegetables every 30 minutes.
7. When internal temperature of 170 degrees F is reached, remove from oven and place lamb on a cutting board. Allow to rest for 20 minutes and cover veggies with foil to keep warm.


Although the thermometer read 170 degrees F, the lamb was more medium then well-done. I am unsure if the thermometer was a bit off or I didn't place it deep enough. It was cooked better at the top then at the bottom. This problem would have been solved with a wire rack over the veggies so heat could circulate the bottom, and then juices would still have dripped from the lamb into the veggies. Some basting would be required however.

The lamb was delicious even with its slight under cooked state, for my tastes. I hate (or love...not sure) to say it but the vegetables were really the star. They were so flavourful with the tomato, wine and lamb working really well together. This meal was rather pricey but definitely worth it. Can't say I will repeat this recipe any time soon for that reason but I would definitely try out the roasted vegetables sans lamb (or maybe with some less-expensive stewing lamb).

I hope to post the rest of the recipes by the end of the week, or maybe even tomorrow if we are granted with a snow day. There is a blizzard coming in Ontario. The members of this household plan to occupy our snow day (because it is happening) with snow angels, baking, movies, and tobogganing. Yes, we are 8 years old. Enjoy the snow!

Tuesday, January 18, 2011

Mushroom and Bean Bolognese

I realized this weekend after my weekly grocery store trip that I need to start to use up my pantry items. I really should take a picture to show you how full my cupboard is. The problem is, I head to the grocery store every week to get the essentials: milk, yogurt, cottage cheese, eggs, apples, bananas (locally grown exception). I then end up buying other things I don't need right now (but will need one day) that are on sale because I cannot pass up a sale. Over the Holidays I also took a trip to Goodness Me to use a gift card my wonderful Grandmother got me for my Birthday. This resulted in stocking up my pantry even more with some foods I have been wanting to try for a while (wheat berries, sucanat) and other items that are a bit too expensive to buy on a regular basis. Now I have a pantry crisis that I must begin to deal with. OH and how could I forget my freezer. I have numerous portions of cabbage rolls, soups, veggies, ripe bananas, meat, you name it, that needs to also be dealt with.

The need to use up my pantry items as well as some mushrooms (which I don't like to keep for very long after purchasing) lead to making this mushroom and bean bolognese adapted from 330 Vegetarian Recipes for Health.

Mushroom and Bean Bolognese adapted from 330 Vegetarian Recipes for Health

1 tbsp
1/2 large red onion, chopped
18 white mushrooms, sliced
2 garlic cloves
1 can diced tomatoes
1 can red kidney beans, drained and rinsed
~ 1/3 cup chopped roasted red peppers (from my freezer)
1.5 tbsp tomato paste
3 tsp oregano
salt and pepper to taste
3 cups dry vegetable shell pasta
Parmesan cheese for serving

1. Heat olive oil in large pot on medium heat. Add onions and saute for 3-5 minutes.
2. Add mushrooms and garlic and saute until soft, about 5 minutes.
3. Add diced tomatoes, kidney beans, roasted red peppers, tomato paste and oregano.
4. Bring to a simmer then reduce to low, allowing to simmer for 15-20 minutes while you cook the pasta.
5. Season sauce with salt and pepper to taste. Top pasta with sauce and sprinkle with Parmesan cheese.


A bolognese sauce is traditionally meat heavy and has very little tomato sauce too it, often just with chunks of tomatoes. Therefore, draining the diced tomatoes would give a more authentic vegetarian bolognese, but I wanted something a little more saucy. This sauce was very thick and almost stew like. I could definitely eat it on its own.

Oh, and I know in my last post I said I would talk about a soup in my next post, but that soup was abysmal. After forcing myself to eat it two days in a row for lunch I decided that no one should make that soup for themselves; unless of course you like flavourless, watery, cruciferous soup. If you do, give me a shout, I have a recipe for you ;).

That's all for now! I should tend to the beets roasting in my oven before I forget about them.

Thursday, December 23, 2010

Salad Rice Paper Rolls

I am home for the Holidays! I have had a crazy few weeks with school. Turns out I did have to wait until the end of term to write another post. Which works out well actually, the Holidays bring lots of food which means lots of preparing/cooking which give me a lot to write about. Just this past weekend my good friends and I had our 4th annual Christmas potluck party. This year the mom's came along and we each made something to bring along. Normally we have WAY too much food but this time it was the perfect amount with a bit of leftovers.

I decided to make rice paper salad rolls. I decided this after flipping through a book my Grandmother gave me for Christmas, called 'The Complete Illustrated Book of Herbs' by Reader's Digest. There was a recipe for the classic salad roll with cilantro and mint. Looked wonderful! One problem though. I cannot stand cilantro. So something different had to be done. The result was these Goat Cheese Salad Rice Paper Rolls:

Goat Cheese Salad Rice Paper Rolls:


rice paper (small size)
goat cheese
cucumber, sliced julienne
carrots, matchstick cut
muschrooms, chopped finely
alfalfa sprouts
sweet chili sauce, for dipping

1. Dip rice paper in warm water until soft to roll. Shake to remove excess water.
2. Put goat cheese in a row on the middle of one side of paper.
3. Top with veggies. I used cucumber, carrot, mushrooms and alfalfa sprouts.


4. Wrap it up. Fold up the one side, then the bottom, and then follow with the other side. Rice paper is actually really easy to work with and after a couple you get the hang of it. It sticks together so they hold fairly well.
5. Serve chilled with sweet chili dipping sauce.


These make for a great appetizer at any holiday party. My Mom requested I make these on Christmas eve! I imagine making many different varieties of them in the future. Since the package seemed to come with a thousand pieces of rice paper, this is definitely going to happen.

Well, tomorrow is Christmas Eve! I hope everyone has a wonderful evening with family, friends, and fantastic food and drink!

Cheers!

Monday, November 29, 2010

Lentil and Black Bean Vegetable Soup

As promised here is soup #2 of the winter season. I made it quite a while ago now (nov 19) and as usual I didn't write down what I put in it! So let's see how my memory will serve me today. Usually when it comes to soup I go light on the seasonings and stick to the basil, bay leaf, rosemary variety. That's just how I like it. This time however I went for the cumin, garlic, coriander, chili flavours. While still mild in flavour it was just different enough to make this soup a little bit more exciting.

What also made this soup exciting was that I literally emptied my crisper and made a dent on my pantry while making it. I was just grabbing veggies, cans, and jars left right and center. To my pleasant surprise it turned out rather delicious and not so surprisingly, very hearty.

Lentil and Black Bean Vegetable Soup

1 carton vegetable broth
1 can of stewed tomatoes
water (about a tomato can full)
1 can black beans
red lentils (1/2 cup?)
1 butternut squash, peeled and cubed
1 crown broccoli, chopped
1 can sliced mushrooms
1 can corn
4 celery stalks, chopped
1 bunch of kale, chopped
cumin
garlic powder
coriander
dried chili pepper
cayenne pepper

1. Heat broth, stewed tomatoes, and broth on medium-high until a simmer is reached.
2. Add all veggies (except for kale), black beans and lentils.
3. Once a simmer is reached, reduce heat to medium-low and add spices. I don't remember the measurements but it was about 2:2:1 for cumin to garlic powder to coriander. I just sprinkled them on there. Then the chili pepper and cayenne pepper is to your own taste. Depends on how hot you like it!
4. Simmer for 30 minutes or so until the lentils and squash are soft.
5. Add the kale and simmer for another 10-15 minutes.


This soup is very thick and hearty. Almost like a chili. I added some black pepper and crumbled goat cheese on top. I suspect cheddar would be fantastic as well.


Yup, that is me eating in front of my computer. Not as much of a regular affair as it used to be (a positive thing I think).

I have quite the lineup of food photos for you. I don't think this one post a week deal is nearly enough to handle them. Hopefully I will be able to post some more as the term comes to an end and the Holidays begin!