Pages

Friday, May 27, 2011

Vegetable Garden Update

I meant to post this a few days ago, but, life gets busy, you know? Eight o'clock comes around and the stack of library books on my desk screams, "hurry up and read me!" My crazed book requesting at the library got out of hand and I have bitten off more than I can chew. Along with my current minesweeper kick, life has been busy.

In all seriousness the evenings have been busy this week with various errands, and even some softball. I have a very busy weekend coming up, which once is over, I will be heading to Denver, CO for the week. So, without giving any more excuse, here is a recap of planting the vegetable garden on the Holiday Monday:

With all the rain that we had the previous week, the ground wasn't looking too hot for planting. The garden bed is raised, which is what really saved it. A sunny day on Sunday was enough to dry the bed up just enough to allow us to plant on Monday. There was some drizzle on Monday but for the most part, it was a beautiful day for some gardening. My Dad picked me up at 9:30 am and we headed to Canadian Tire and Sharples to pick up seeds and plants, of course after a Tim Hortons run. We were able to get almost all the plants we wanted. Unfortunately eggplant and rosemary could not be found.

This is what the garden looked like already:

Herb Garden (L to R: chives, lemon balm, oregano, sorrel)
Vegetable Bed

All the plants we have to plant:

The box on the left is what my grandfather gave us from his greenhouse (Marigolds and Romaine Lettuce).
L to R: Marigolds, Romaine Lettuce, Petunias(?)
 The box on the right are the tomatoes and peppers my grandfather grew in his greenhouse from seed:

Basil, Red Pepper, Cabbage, Kale, Melon, Zucchini, Cluster Grape Tomato, Tomatoes, Peppers, Hot Peppers, Rhubarb.
When you plant lettuce from seed, you usually plant a lot of seeds, and then thin it out once it grows. We had romaine lettuce seedlings, so I separated each sprout and planted them separately (as you can see by my feet). I also planted beside the romaine, red leaf lettuce and spinach seeds. Often we forget to thin the seedlings out and never really get heads of lettuce or large spinach bunches. This year it is my goal not to slack off on thinning out the greens.

Although I am not a fan, my Mom loves rhubard. She loves it so much, she may even venture into the garden, bugs and all, to harvest it when the time comes. So, we decided to plant this rhubarb for her. The plant will exist for years to come and will be harvested twice a year. She is excited about it!

The vegetable garden had no more rooms for rent so these kale seedlings got shafted to the herb garden. As far back as I can remember we have never grown kale. It is my favourite green so I am really excited!

The herb garden. A new addition is the basil plant. We plant basil every year but it doesn't last through the winter. Normally we plant the herbs in pots in the ground because they tend to spread like wildfire. This year, I thought it would be nice to plant the basil in a pot that can be taken indoors. It fits nicely in an indoor pot holder that we have. We also plan on planting rosemary in it so that throughout the winter we have fresh basil and rosemary, two of my favourite herbs! Another addition to the herb garden will be a bay leaf tree that my grandmother will be bringing us.

Another herb garden veggie is swiss chard which was planted from seed. Some leek seeds were planted somewhere in the herb garden too but I cannot remember where. We will soon find out!

After all the plants/seeds were planted I took a picture of each bed as some nice before pictures.

L to R: Romaine Lettuce, Red Lead Lettuce, Spinach, Parsnips, Beets.
Garlic planted last fall, Marigolds line the entire garden.
From Front to Back: Green and Red Cabbage, Hot Pepper, Cluster Grape Tomatoes
Various Green, Red, and Hot Peppers
Tomatoes!
..and more tomatoes! With cucumbers in the back. Romaine lettuce planted in between the rows for now, which will be harvested once before removing.
Honeydew, Watermelon, Zucchini (yellow and green), and Cucumber (along the back so it can climb the fence).
There is another row which I didn't take a picture of. It is all just beans planted from seed so not too exciting to see. We planted more this year than usual so I am looking forward to drying some of them to have some dried beans for the winter. 

Not living at home this Summer is going to make it more difficult to help out with garden maintenance and harvesting. Since I don't live far away (20-30 min bike), I will be able to make it home at least once a week, so I will get to see the progression of the garden still. Often times we have more produce than we can handle, and I hope to make sure none of it goes to waste. Also in the spirit of not wasting, we had some extra plants which I decided to plant in pots and take home. I now have two pots with two tomato plants and three pepper plants on my porch. So far, 2/3 nights, my pepper plants have been dug up by some pesky animal, probably the neighbourhood cats. Unfortunately, to my dismay, I report the loss of a hot pepper plant. Poor thing. No capsaicin to defend itself against animals yet.

Anyway, this post seems long enough, I hope I didn't bore you. I hope to share more updates throughout the summer, and some recipes with the resulting vegetables. Have a great day!

* I would like to note this is the second time writing this post, as the first one didn't save and an error occurred (ugh..). At this point, zero editing has occurred, and you can blame errors on my lack of patience, not on my lack of spelling/grammar ability.

Sunday, May 22, 2011

Iced Ginger Tea with Lemon

While May has been quite a rainy unspring-like month, we have had a few really warm days that tell us Summer is on it's way. In the summer I often turn to refreshing drinks during the day time, as a way to spice up that usual cold glass of water. I usually go on 'streaks', where I drink a particular concoction every day for a few weeks. Last summer it was lemon water. Every morning, and sometimes in the afternoon, I'd have a large glass of water with half a lemon squeezed into it, with lots of ice. Very refreshing and a good dose of vitamin C. Last summer I also experimented with Iced Green Tea. I loved having a pitcher of it in the fridge, as you cannot really make iced tea on demand. I'm not big into sweet beverages so adding just a bit of frozen fruit does the trick.

A few weeks ago I made some ginger tea as a way to use up some ginger I had laying around. I loosely followed this recipe. I didn't like it so much warm, but after chilling it in the fridge and adding some lemon I loved it! The lemon neutralizes a bit of the spice of the ginger and makes quite a refreshing beverage.

The easiest way to make this is to:

1. Slice the ginger, add some cold water, bring to a boil, cover, remove from heat and then let sit on the stove until it is warm to touch.

2. Transfer to a pitcher (removing ginger pieces) and put in the fridge.

3. Once chilled, add the juice of 1 lemon (for about 4 servings).

The more ginger you add, or the longer you let the water simmer, the stronger the ginger flavour will be.

Again, I don't sweeten this usually but a few frozen raspberries add some natural sweetness.

I am looking forward to experimenting with some more iced tea combinations as the summer approaches.


I also would like to share that I baked my first yeast bread last week without the use of a bread machine. I made the Oatmeal Sandwich Bread from Good to the Grain. I had to make a substitution so the bread was a bit crumbly but the flavour was still amazing! It was great on its own with some jam or peanut butter. I saved a butt end of the loaf to make a stuffed french toast similar to this. The long weekend is a great time to experiment with new breakfast recipes and I am totally taking advantage. I have recently played around with chickpea flour and I have an idea for a pancake recipe which I am hoping turns out so I can share it with you all.

Hopefully everyone is having a great long weekend and have managed to get into the outdoors a bit. Here is a shot I took on Saturday from Princess Point in Hamilton.


Not the nicest scenery but it was nice to be outside. On Mother's Day weekend I got a nicer shot from the Bayfront on the other side of the bridge.


One thing is for sure, the rain is sure making the grass green.

Tuesday, May 17, 2011

BBQ Baked Beans

In the last 5 or so years that I have been a bean eater, I have never once eaten a can of 'baked beans.' Unless those beans served at a rib fest pulled pork stand were indeed from a can. But I doubt it. Either way, I have only had baked beans once, and the sauce was reminiscent of BBQ sauce. To me, baked beans should taste smokey, as if they had been meat in a previous life which had been charred on the grill slathered with sweet smokey goodness.

On that carnivorous note, I have recently decided to eliminate meat from my diet for the time being. Now, if you follow the blog, you could probably tell that I don't eat meat often anyway. However, usually once a week, I have dinner with my parents which normally involves meat. So this Sunday I wanted to have a protein item that could be easily incorporated into my family's dinner without too much trouble. Ribs were on the menu, along with baked potatoes and lots of veggies. Beans came to my mind right away. I would have them in some kind of sauce, over a baked potato, topped with guacamole. mmmm... But it wasn't until my dad coated the ribs in BBQ sauce, when the recipe for these baked beans really came together. One or two tablespoons is all it took for that smokey flavour to come though.

BBQ Baked Beans

1 tbsp olive oil
1 small onion
2 garlic cloves
1 can black beans, rinsed well
1 cup water
1/2 small can tomato paste
1-2 tbsp smokey BBQ sauce
1/4 tsp lemon zest

1. Heat olive oil in saucepan on medium heat. Add onions and sauté until soft. Add garlic and sauté for 1-2 minutes.
2. Add beans, water, tomato paste, and BBQ sauce. Stir and bring to a simmer.
3. Add lemon zest and stir in. Simmer until desired consistency is reached (0.5 to 1 hour). Once desired thickness is reached, cover and keep on low heat until ready to serve (up to an hour).
4. Serve over baked potato or with good crusty bread.


From my experience, these beans are good over regular and sweet potato. I also imagine it would be good served on their own with some good crusty bread. It has been a while since I have come up with an original recipe in which I would not really change anything next time around, so you should definitely try these. I also see this turning into a great lentil sloppy joe recipe.

Did I mention these kind of taste like summer? While the weather is telling us otherwise, this is definitely a recipe to get you in the mood for summer.

Sunday, May 15, 2011

Crunchy Quinoa Granola

No this is not a picture of bird seed. It is actually human food: granola made with quinoa! I was looking for something to have in the morning that wasn't oatmeal and was higher in protein. I began to search my evernote database for breakfast recipes. I came across this toasted quinoa recipe I had saved from Healthy Tipping Point. I thought I would give it a try. I made a few changes but the same concept was the same: a granola made with quinoa.

I was a bit skeptical since I had never eaten quinoa that wasn't cooked through boiling, and was weary as to how the texture would be. Turns out, toasted quinoa is actually not like eating pebbles as I thought it would.

Crunchy Quinoa Granola adapted from Healthy Tipping Point
makes 4-5 servings

1 cup quinoa
~ 1/4 cup of nuts (I used what I had on hand...sunflower and pumpkin)
3 tbsp dried cranberries
1 tbsp cinnamon
1 tbsp olive oil
2 tbsp pure maple syrup

1. Mix all dry ingredients in a bowl until cinnamon evenly coats everything.
2. Add olive oil and maple syrup and mix well.
3. Toast at 350 degrees F for about 10 minutes, stirring every few minutes.
4. Allow to cool and then store in an air-tight container.

As I was making this I really thought I had added WAY to much cinnamon. I thought for sure I had just wasted a whole cup of quinoa because it was going to be too strong and spicy. Too much cinnamon can taste medicinal. Turns out, the baking mellowed out the cinnamon and it had great flavour. I am really happy I added the cranberries because they were a wonderful addition, especially when I eat this with my plain unsweetened yogurt.

I'd say this recipe is very "granola." Someone used this word the other day to describe my act of making homemade tomato sauce (if I remember correctly). I liked the word and what I thought it represented, so I vowed to begin to use it more often. After looking up the urban dictionary definition, I'd say this recipe is fairly good representation of "granola," except I can't promise my ingredients were fair trade. In fact, I could probably bet that they weren't, unfortunately.

Sunday, May 8, 2011

Mother's Day Cheese Party with Baked Brie

Happy Mother's Day to all Mom's out there! We all have a Mom in our life, whether biological, or another woman we look up to. My relationship with my Mom has strengthen over the last couple years, as I have gotten older, and I look forward to spending time with her on the weekends (and I am not just saying that because she reads my blog). This Mother's day instead of buying her something she really didn't need, I thought I would spend money on something we could do together.

Last weekend I was walking down Locke St. in Hamilton when I passed the Cheese Shoppe on Locke. I had been in a few times and it is a wonderful store. It has a great atmosphere, and fantastic products. These include cheese (obvi), jams, marinades, spices, vinegars, oils, pasta, pies, lots of locally produced as well as imported goods. My Mom has not been in the store before but I knew she would love it, since she loves cheese just as much as I do, so I picked up a gift certificate.

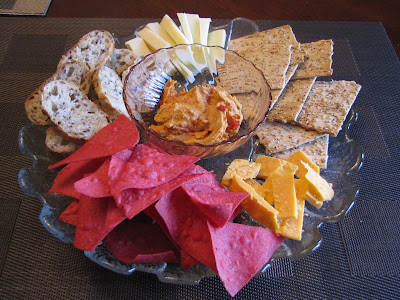
Today we took a trip to the store together and Mom picked out 3 different cheeses and a jam. To go along with the cheeses we picked up spelt flatbread crackers and a multi-seed sourdough baguette from local De La Terre bakery. The bread from De La Terre bakery tastes amazing, not to mention it is local and organic. (can be found at Goodness Me as well as the Hamilton Farmer's Market).

Our platter of goodies:


Starting from the left we have the sliced sourdough baguette. Going clockwise, the first cheese is Asiago. It was very mild, especially compared to what I am used to. The Zerto Asiago is from Wisconsin and is aged for 6 months naturally. This short aging time makes it more soft and mild. I enjoyed it but it wasn't the star of the plate.

Beside the Asiago we had some spelt flatbread (was excellent with the baked brie). Now here was the show stopper. 9 years old raw milk cheddar from Ontario. Never have I had raw milk cheese, nevermind cheddar aged 9 years. I think the most I've had is 5 years. It was strong, but delicious. I loved this cheese on the sourdough bread and found that while the cheese was very strong and overcame the flavour of the bread, the aftertaste of the cheese was generally pleasant and not too overbearing.


Beside the cheddar was some Que Pasa chips (coloured with beet juice!) which was enjoyed with Summer Fresh spicy chili pepper topped hummus. While all this was being assembled, the Brie cheese was baking in the oven.


To prepare the baked Brie the rind was removed from one side of the wheel. Then an Apricot and Jalapeno jelly was spread on top.


This was then baked in a 350 degree F oven for 15-20 minutes.


We chose this jelly after trying a strawberry and jalapeno jelly at Whole Foods which was sooo good! Should have bought it when we had the chance! This one was delicious as well though. I love the sweet and spicy combination.

We also had my Mom's favourite Sangria and a green salad.


It was nice to have some time just my Mom and I at home, and sample some new cheeses. I think she enjoyed her "cheese tasting" Mother's Day gift...Mother's Day success! 

Wednesday, May 4, 2011

3 Layer Bean Dip

Does anyone know what day tomorrow is? May 5th! Cinco de Mayo! Basically, a perfect excuse to eat Mexican food, which I love. This recipe comes at a perfect time then. I made this dip about a week ago to have with the chips I bought at Whole Foods. It is comprised of "refried" beans, guacamole, and salsa. This dip can easily be prepared with pre-made versions of the three layers, but can also be made from scratch fairly quickly. I opted for a store bought salsa however.

3 Layer Bean Dip

for the "refried" beans
1 can black beans
~2 tbsp olive oil
1/2 medium onion, chopped

for the guacamole
1 avocado, chopped
1/2 medium onion, chopped
3 garlic cloves, minced
1/2 tomato, chopped
1 tbsp lemon juice
1/2 tsp cumin
1/2 jalapeno minced after seed removal

salsa

1. Combine ingredients for bean layer in food processor and process until smooth.
2. Combine ingredients for avocado in food processor and pulse until combined with some chunks still present.
3. Layer into a dish. Top with salsa.


It is really that simple. My dip was a bit bean heavy (as you can see in the picture) so I would probably layer less next time. This is my favourite guacamole recipe and the salsa I used was very flavourful and tasted fresh. Because of this, I was forgiving of the fairly bland bean layer, since the guacamole and salsa made up for it. This was my first time using black beans to make a dip, and next time I think I would kick it up a notch with some garlic or seasonings. The beans had a great texture though.

This dip went will with chips (obvi), carrots, and even spread on some toast.  It is incredibly versatile and would make a great addition to any Cinco de Mayo spread. Along with some lime margaritas of course.

Sunday, May 1, 2011

Almond Butter Parsnip Fries

Finding another way to use almond butter (or any other nut butter) is the last thing I need, but I had been wanting to try this recipe for a while. It is from Oh She Glows, where Angela claims that these fries will change your life. I was a bit sceptical since parsnips are not my favourite vegetable, but I'll try anything coated in almond butter. You can find the recipe for these here.


The coating on these fries is absolutely delicious. It is a great combination of sweet and salty, which works wonderfully with the roasted parsnip. The only a problem I had is with cutting similarly sized fries to prevent over cooking some and under cooking others. But that could be easily solved. I have made these a few times since, as this is a great option for spicing up boring winter root vegetables.

Green in the Kitchen Tip #1 (yes this may turn into a series..)

I have mentioned before how I have been trying to be less wasteful in the kitchen. This also helps to save some money. One aspect of cooking which tends to be wasteful (vitamin waste anyway) is cooking water. I usually don't think twice about dumping water that I cooked pasta or vegetables in, but a couple weeks ago I was steaming some artichokes, and I added a garlic clove and bay leaf in the water that was boiling. When I took the artichokes out I noticed how green the water was, and fairly flavourful too (yes I tasted it). It was basically garlic and artichoke infused water. Instead of pouring this down the sink I kept it in the fridge until a day later when I made some rice. I used this flavourful (and probably vitamin enriched) rice to cook the rice instead of water. Perfectly good use for my extensive mason jar collection.
Looks yummy, right?
Saving cooking water to use later for cooking pasta, rice, or other grains hardly saves you a penny, but it does add a little something to the dish, saves a little bit of water, and adds some vitamins that would otherwise be lost. I noticed on Easter that this is a practice my Nonna uses. She cooked the pasta in a green tinged pot of water which I am assuming was from the beans or rapini she prepared earlier. Why throw away perfectly good water?

To my fellow Canadians, tomorrow is May 2nd, election day! Don't forget to VOTE!