Pages

Tuesday, December 27, 2011

Merry Christmas and Happy Holidays!

It has been quite a while since my last post. The weeks leading to Christmas I wasn't doing a whole lot of cooking and didn't feel inspired by very many recipes. However, as Christmas drew closer things became quite hectic and while I was cooking/baking up a storm I did not have the time to write this post. It has been in my head for at least 4 days. It turned out to be a blessing in disguise as I have a ton of Holiday pictures to share. There will not be a recipe today but hope to share lots of the recipes in the upcoming weeks that I made over the Holidays.

The Holiday season was kicked off by a cookie swap with the gals at school. It was quite successful and I came away with lots of delicious goodies.


For the cookie swap I made gingerbread biscotti. They were a big hit with my family, so I made extra to have around the house. After a family Christmas party, they were all gone! I made another batch to take to my boyfriends house, and for my Mom to give to her friends. I think I made about 8 dozen in total in the lat month. I have a feeling these will be made next year as well.


Every Christmas my close friends from high school get together for  Christmas dinner. This was the 5th year in a row we have had this event. A while ago I saw a pin on pinterest for 'lumps of coal'. I immediately knew I wanted to make this for my friends at the dinner. They weren't the tastiest rice crispy squares I have ever had but they were a cute idea.


This year we decided to make sushi together! Everyone but myself had made sushi before so I was the newbie for once. It was absolutely amazing and was also a lot of fun. I enjoyed making sushi so much that I also made it with my family on my birthday 3 days later. Every year there is at least one person not able to make the dinner because they are off on another part of the world. This year Dani was in New Zealand and not able to come home for Christmas. She was there in spirit!


Christmas Eve in my family is a low key affair which usually includes dinner at home, church, and watching a classic Christmas movie. This year I wanted to have a part in preparing dinner. Alongside my Dad's scallops and calamari, I made three veggie dishes so I had a nice variety. They all turned out fantastic.

Balsamic Glaxes Butternut Squash
Spaghetti Squash and Peas with Parmesan
Caramelized Brussel Sprouts


Roasted Potatoes with dill


And of coarse there was dessert. I made pumpkin gingerbread cake with caramel sauce. It was absolutely delicious. I hope to share all the recipes soon. 


On Christmas Eve I also baked a loaf of bread, so needless to say I was busy. But with some Christmas music on I was loving it. I baked bread because I was making baked pumpkin overnight french toast. This was my first time making baked french toast and was fantastic. Perfect for Christmas morning.


Last but not least I wanted to share some books a received as gifts. Miraculously, I managed to not make any purchases at Chapters like last year. I am really looking forward to reading Healthy Bread in Five Minutes a Day, as I have been making the same bread recipe for a year now and am looking for some diversity. Plate to Pixel is a food photography book I have heard great things about. Hopefully the information will translate into better photography on the blog, because I definitely have a lot of room to improve. And then there is Plenty. This book is all vegetarian recipes, and they look AMAZING. I flipped through the book already and cannot wait to try out a lot of the recipes. Many of them look just delicious and rich and flavourful. I feel like this book will be used a lot next Christmas.


I hope everyone had a great Holiday, I know I did. Stay tuned for some of the recipes that I mentioned in todays post!

Thursday, December 1, 2011

Enchilada Lasagna

I am really excited to be sharing this recipe with you today. I have seen the idea of an enchilada lasagna around for a while, and after making some homemade tortillas, I thought, why not try it out! The tortillas that I made were not the roundest and most even looking tortillas so I thought they would fare well in this recipe.

Tortillas are actually really easy to make and taste infinitely better than most of the grocery store varieties. Not to mention the short ingredient list. Flour. Oil. Milk. Baking Powder. Salt. That's it. No glycerides, no fumaric acid or a number of other presumably preservatives. I used this recipe from the Homesick Texan. I used half whole wheat flour and they seemed to turn out well. When you make these, don't forget to have one when it is still warm and fresh. You will not regret it.

This recipe from Perry's Plate was the inspiration for using the tortillas for an enchilada lasagna, instead of making just plain old enchiladas. The recipe is totally adaptable to your taste and preferences, but this is how I did it:

Enchilada Lasagna adapted from Perry's Plate and Simply Recipes
serves 4-6

Sauce:
1 tbsp olive oil
1 medium onion
3 garlic cloves
1 cup of salsa
1 can of crushed tomatoes
3 tbsp tomato paste
1/2-1 cup of water

Tortillas (I suggest you make these; I doubled the recipe)

1 tbsp olive oil
mushrooms
red peppers
corn
black beans
spinach
shredded cheddar cheese

1. Heat olive oil on medium heat. Saute onion and garlic until cooked. Add salsa, tomatoes, tomato paste and water. Add water to make the sauce according to your desired consistency. You don't want it too thick because it will thicken up even more in the oven, but too thin will result in soggy tortillas.
2. Reduce heat to low and keep warm while preparing the lasagna.
3. Preheat oven to 425 degrees F.
4. I decided to do sautéed vegetables. In a large pan, heat olive oil over medium heat. Add all vegetables except for the spinach and beans. Once the vegetables are cooked, add the black beans and stir to combine.
5. In a large greased baking dish, add a little bit of the sauce to the bottom and spread around. Place a layer of tortilla. Add 1/2 of vegetables, top with sauce and spinach. Place a layer of tortilla, add the rest of the vegetables, add sauce and spinach. Place the final layer of tortilla, add a little bit of sauce, and sprinkle some shredded cheddar on top.
6. Bake at 450 degrees F covered with foil for 20 minutes. Remove foil and bake for another 10 minutes. Allow to sit for 5-10 minutes before cutting.


This is an amazing dish. It makes great leftovers, and is very easy to assemble. I cannot wait to make it again!

Sunday, November 13, 2011

Oatmeal Sandwich Bread Pt 2

Last May, I made my first yeast bread without the use of a bread machine. I semi-followed a recipe from Good to the Grain by Kim Boyce. I made a flour substitution and I don't think I used the right molasses. It tasted delicious, but would not slice we'll. It was great for snacking and making french toast, but was not good for sandwiches.  Last weekend I made the bread again for the first time in a while, following the recipe to the tee. It was oatmeal sandwich bread, and it was delicious. It cut fairly well, made good sandwiches, made good toast, and made good french toast.


With that success, I decided to get back on the wagon of baking all of my bread products again (at least for now). It may be time consuming, but it is always worth it. The weekend is the prime time to do this type of work. With rising and resting times it can seem like it will take forever, but it is a great activity for a lazy Saturday or Sunday morning. While my Sunday today wasn't that lazy, I still baked a loaf of bread. I found I went through the last loaf a little too quickly, so I decided to make the loaf smaller and make some other items with the dough. So, after the first rise I split the dough in half, baking the first half as a loaf, and the other half into 8 cute little buns.


After slicing the bread, I pop it in the freezer and it stays fresh for the week. I hope I can keep up this weekend 'ritual'. I would love to share the recipe for this bread, but there are a couple things holding me back. 1. I feel bad posting a recipe I have not altered one bit, which is found in print only, and 2. The written directions are far too long to type. One part moral, one part lazy.

Bread wasn't the only 'bread product' I made today. I'll give you a hint, it normally has a really long ingredient list, I have been wanting to make them forever, and I have even tried a chickpea flour variety. If you guessed wheat tortillas, you are right! They were amazing so stay tuned for the recipe!

Tuesday, November 1, 2011

Dutch Pancakes

Breakfast is my favourite meal, yet I tend not to include too many breakfast recipes around here. It is most likely because unless it is the weekend, I don't have time to try a new recipe or take pictures of the finished product. Last weekend I managed to make something new. When I say something new, I mean that I had never made these before, but I have eaten them once, quite a while ago.

Last year we had an exchange student spend 8 months at our school. His name was Bas, and he was dutch.  He always talked of these dutch pancakes. Finally he got the recipe from his family back home, and made them for my roommates one evening. It is a very basic pancake recipe which can be adorned with all type of toppings or fillings. I chose peanut butter of course.

They were dense and thinner than regular pancakes and I really enjoyed them. I asked for the recipe, and received this email from the Bas man:

Dutch Pancakes

--email quote begins--

- 500 gram (2,5 cups) of flour
- 750 ml Milk
- 4 eggs
- spoon of corn oil

Mix this together till the batter is smooth, and fry the pancakes in a frying pan with a little piece of butter (or you can use that stupid oil-spray if you like). Wait till the batter is allmost dried up, and than flip the pancake. Let the other side fry a little while and then the pancake is ready, keep it warm.

Pancake options:
- plain (serve syrup en powder sugar)
- apple (put slices of apple in the batter when it's wet)
- bacon ( cook slices of bacon and put them in the batter when it's wet)
- cheese (put them on 1 side of the pancake when the batter is almost dried up, then flip the other half over the cheese half)
- raisins/blueberries/other stuff like that
- spinach (only eaten by veggie-freaks. Highly unrecommended by Old Dutch Pancake Guru's, since it severely damages the taste of the pancake)

--email quote ends--


I know, the picture does nothing for those pancakes, but I hate leaving out a visual.

The last pancake option listed in the recipe was definitely a jab at my roommate Jenna's "veggie freakiness" where she added spinach to the cakes. Don't worry Bas, I would never add spinach to these.

However, I did add syrup on one, and peanut butter and banana on another. I think I would also try goat cheese next time.

While I have not posted much in the last month, I have actually come across some great recipes. I have been fairly busy, but I am hoping to be able to share them with you soon.

Is it too soon for me to say: 2 months until Christmas!

Tuesday, October 18, 2011

Butternut Squash and Red Lentil Stew

How is everyone enjoying the fall weather? It has been a tad rainy, but I like the cool winds. It make me really want to be a home body. Last Friday after school and a trip to Costco with my Mom, I changed into some pyjamas, opened up my laptop, put on some jazz music, and just cooked. I was in no rush and I thoroughly enjoyed the time in the kitchen

That evening I cooked two dishes from Oh She Glows. The first, I won't even mention because it was so horrendous. I am sorry OSG but I have actually found a recipe of yours that I didn't love. I will never mention it again from here on out. The second recipe was a major winner, and thank goodness because I needed something to eat for dinner. I have actually followed this recipe twice tweaking it a bit the second time. It was not quite as good. I will share the recipe for how I would make it the next time, with some notes on possible modifications.

Butternut Squash and Red Lentil Stew from Oh She Glows

1 tbsp olive oil
1 small onion, chopped
3 garlic cloves, minced
1 tbsp curry powder
1L vegetable broth (It is important to use good quality broth - I use Imagine organic or homemade)
1 cup red lentils (you can use green lentils but they need more time and more liquid to cook - do not get as mushy)
3 cups cooked butternut squash* (I also tried with acorn, which wasn't as silky and sweet as the butternut)
1 cup finely chopped kale (1/2 cup frozen spinach also does the trick)


1. Add olive oil to pan and put onto medium heat. Add onion and garlic.
2. Sautee for 3-5 minutes until fragrant. Add curry powder, cooking until onions are soft.
3. Add broth and (rinsed) lentils. Bring to a boil, and then lower heat to a simmer.
4. After simmering for 10 minutes, add butternut squash and kale. Simmer for another 5-10 minutes to desired consistency.
5. Serve in a large bowl with some good crusty bread.

Note: I tried adding the ginger, which was in the original recipe, in the second batch and I much preferred the stew without it. But your taste might be different.

*To cook butternut squash, place on pan face down and roast at 425 degrees F for about 30-40 minutes, depending on the size of your squash. Scoop out the insides to use for the recipe.


This was such a great meal for a cold and rainy Friday evening. I love when I can find that 'comfort food' feel in something that is this healthy. This recipe will definitely be made over and over again this season as it is really quick if you have some butternut squash pre-cooked. It is also a good reason to stock the freezer with some cooked squash.

This weekend I also took advantage of a dry (but very windy) morning, to cut some herbs from the garden to dry. I picked oregano, rosemary, and lemon balm (as seen in picture). There wasn't much oregano since the lemon balm kind of took over, but there was lots of rosemary (my favourite). I will hang these to dry so that I can have garden herbs throughout the winter!


Has anyone else come across a great healthy comfort food recipe lately?

Tuesday, October 11, 2011

Pumpkin Muffins

I hope everyone had a wonderful Thanksgiving! I had a really busy thanksgiving weekend, but it was great! I really geared up for Thanksgiving this year. I was very much in the mood for it and was loving the cooler weather. Although it wasn't a nice cool fall weekend, it was still beautiful. I managed to spend some time outside and catch the changing colours of all the greenery in Hamilton.


Last weekend (before thanksgiving) I purchased a can of pumpkin puree. Pumpkin puree comes in an unneccessarily large can. I have to make diligent plans as to what I am going to make with it once the can is open. Last week I made pumpkin muffins, pumpkin granola, pumpkin oats, and more pumpkin muffins. All with one can of pumpkin. By far, the pumpkin muffins were the best of the three, and were quite the hit at my family's thanksgiving dinner (especially with my Mom).

Pumpkin Muffins very slightly adapted from Ellie Krieger on the Food Network

1 cup all purpose flour
1 cup oat flour*
1 tsp baking soda
1/4 tsp salt
1 tsp ground cinnamon
1/2 tsp ground ginger
1/4 tsp ground cloves
1/8 tsp ground nutmeg
3/4 cup of *not packed* brown sugar
3 tbsp unsulphered molasses
1/4 cup canola oil
2 large eggs
1 cup canned pumpkin
1 tsp vanilla extract
3/4 cup milk

1. Preheat oven to 400 degrees F. Spray a 12 cup muffin pan with cooking spray.
2. In a medium bowl, whisk together flours, baking soda, salt, cinnamon, ginger, cloves, and nutmeg.
3. In a large bowl, whisk together the sugar, molasses, oil, and 1 egg until combined.
4. Whisk in the 2nd egg.
5. Whisk in pumpkin and vanilla.
6. Whisk the dry ingredients into the wet ingredients in 2 batches, alternating with the milk. (order of addition: dry, milk, dry milk)
7. Spoon into the muffin pan. Bake for 20-23 minutes.


These muffins are devine. They have the right amount of spice, softness, and sweetness. I think next time I could even cut down the sugar to 1/2 cup. I wanted to make a note about the flour, since I deviated from the original recipe. I used oat flour instead of whole-grain pastry flour, simply because that is all I had on hand. These leads me to believe you could get away with a few different flour combinations, maybe substituting all the all purpose for whole wheat, pairing with some oat flour. I will definitely be experimenting in the future.

Now, I am not the biggest pumpkin fan in the world, but these were my favourite use for pumpkin so far this season. I am sure I will go through another can or two before the season is over, and hopefully I find another winner like this one.

Thursday, October 6, 2011

Chili Cornbread Casserole

It is that time of year. The temperature is dropping, the leaves are turning, and I start listening to music I deem appropriate for fall. I also get kinda giddy sometimes and enjoy doing work on the couch rather than at my desk. Fall has arrived officially in my mind. A slow wonderful process to winter! This new season also makes me want to make classic comfort food. I want root vegetables, hearty greens, dense breads, all of which are consumed warm.

I also want one pot dishes. One of my favourites is chili. My Mom decided to make chili on Sunday so I immediately knew how I wanted to modify it. Just before she added the ground beef. I scooped up some chili to make this Cheddar Chili Cornbread Pasta Bake from How Sweet It Is. It first caught my eye on edible perspective and I knew I would make it one day. That day was Sunday. It is a really simple recipe that was perfect for my first comfort food dish of the season.

1. Grease a casserole dish.
2. Add pasta.
3. Add chili.
4. Add cheddar.
5. Top with corn bread batter.
6. Bake according to cornbread directions. Some time will have to be added to the baking time.


I would definitely make this dish again. But next time I would make some changes.

1. Less pasta, a lot less pasta. I found after baking it was too pasta heavy when really I wanted more chili.
2. More chili, with more liquid. Adding to the note above, more liquid in the chili would have made a more saucy consistency.
3. Add only 1/2 of corn bread batter. I added a bit more and it was just too much.
4. Add less jalapeno to the cornbread, if at all. I found that it was just too spicy, and was too much with the spice I added to the chili. I only added 2 jalapenos even though it called for 3!

Other than those changes, it was a great dish which is perfect for this time of year. You can expect more recipes of this type in the coming weeks.

To all you Ontarians out there, I hope you voted today!

Sunday, September 25, 2011

Collard Green Chips

I'm going to be honest, this post barely contains a recipe. But, it does contain an idea. An idea that you should embrace, attempt, and then explore. 

If anyone has trouble getting enough leafy greens in a day, this idea is for you. 
If anyone has kids that wont touch a vegetable, this idea is for you.
If anyone gets a hankerin' for salty chips on a weekly basis, this idea is for you.

Embrace...
This idea is not new. In fact, a whole year ago I posted about it. It wasn't new then either. The idea is baking hardy leafy greens in the oven until you get chips. This time the star of the show was some collard greens. I have to admit that I had never purchased this leafy green before. However, when I saw the large bunch at the store, I knew what I wanted it for.

Attempt...
Collard Green Chips

1 large bunch of collard greens
1 tbsp olive oil
1 tsp garlic powder
1 tsp chili powder

1. Preheat oven to 425 degrees F
2. Remove tough inner stem of the leaves.
3. Break leaves up into smaller pieces.
4. Toss leaves in olive oil, until evenly coated, 'rubbing' the oil into the leaves.
5. Add garlic powder and chili powder and mix until evenly coated.
6. Place leaves in a single layer on a baking sheet. (note: do not layer the leaves or they will not cook consistently)
7. Baked in 425 degree F oven for ~10 minutes, turning halfway through, until crispy.

I apologize for the iPhone quality picture, but I was too busy eating a whole bunch of collard greens to get my actual camera out. That is right, I ate a whole bunch of collard greens. I wasn't kidding when i said this is a great way to get your leafy greens in. 

Explore...
The best part is that you can season these however you like. I can imagine using a splash of balsamic, dill, cumin, curry powder (not all together of course), or whatever your heart desires! There is a lot of room for experimenting here. Just be sure to lay off the salt (I usually don't add any). The dehydrated greens actually taste a bit salty naturally!

Not only can you experiment with different seasonings, but you can also experiment with different greens, or other vegetables for that matter! I have only attempted kale and collard, but swiss chard, beets, sweet potatoes, carrots or turnip would also work (adjust oven temps and times accordingly). Fall is the perfect time to experiment because the hearty greens and root vegetables are definitely in season. 

I would love to hear about any vegetable/seasoning combinations that turn out to be winners!

Monday, September 19, 2011

Homemade Beet Pasta with Zucchini and Goat Cheese

I finally did it! I finally made homemade pasta! This has been something I have wanted to do for over a year, and finally I made an attempt at it! Now, it might seem like all I do now is eat and make Italian food since I got back from Italy. I swear, that is not the case. I still have been making overnight oats, lentil stews, and salads galore. However, as I was looking at some of my evernote recipes, I came across this beet pasta by bell' alimento. Bell' alimento is filled with Italian recipes, so I suggest you take a look around the site. Anyway, this caught my attention because not only was the pasta beautiful, but we had some beets from the garden that were ready to be pulled. Perfect timing.

Homemade pasta is incredibly simple to make, especially when you have a kitchen aid mixer. I am lucky enough to have access to one right now so making the dough was a breeze. I followed the recipe from bell' alimento almost exactly, so you can reference from there. However, I did substitute some kamut flour (1 cup) for some of the all purpose.  I also had to add some more water, which may be due to the flour substitution. It also might be because my beet puree was not as fine as it should have been. I recommend you really pulverize those beets.

Addition of the Beet Puree
Mixing in the Beet Puree
While i did have a kitchen aid to make the dough, I do not have any utilities to actually make the pasta itself. This means that I was working hard rolling out the dough as thin as I could, and then using a pizza cutter to make my pasta. Let's just say it was rustic.

Wearing a pane (bread) apron my Nonna brought my Mom from Italy
Since I was making this for dinner and it was already 6:30 when I started, I made the pasta in batches. The first batch was for dinner that night. It was a little thick.

The First Batch Drying
This made it difficult to cook and the pasta was very large. It really didn't matter though. Because it was homemade it didn't feel too chewy, and was still delicious. It was a little disappointing though when the vibrant red colour turned pale pink upon boiling, and the water took up most of the colour. It still look pretty against that green zucchini and the goat cheese. It was such a beautiful dinner.

Homemade Beet Pasta with Zucchini and Goat Cheese

1 serving of homemade beet pasta
1/2 medium zucchini, sliced thinly and in half
2 garlic cloves finely minced
1/2 tbsp olive oil
1 serving of goat cheese

1. While pasta is cooking, heat olive oil on medium heat until pan is hot.
2. Add garlic and sautee for a few minutes until fragrant.
3. Add zucchini and heat until cooked through.
4. Drain pasta and add to the pan, tossing to combine.
5. Add goat cheese in crumbled and toss to combine.


How pretty is it! It isn't only pretty but it tasted good too. Such a good dinner that was worth the effort! Next time it won't be so effort filled though. After dinner I took the rest of the dough out of the fridge and rolled it out, thinner than I had before. I also cut this one into lots of different shapes. This was really one big experiment.


I made some lasagna noodles, linguini, and farfalle. I allowed them to dry overnight between two tea towels. the lasagna noodles needed some extra time, but in the morning I bagged up the pasta in ziploc bags and stuck them in the freezer. We will see how the recipe handles it.

I am really excited to try out some more pasta recipes since it isn't all that hard. I think I might put a pasta roller/maker on my Christmas list though.

Sunday, September 11, 2011

Trofie con le Acciughe

This post is coming later than I would have liked but it has been a busy week. I think I am FINALLY settled back in, living with my parents. Shortly after my return from Italy I really wanted to recreate a pasta dish I had in Venice, at a restaurant called Osteria alla Botte. It was linguinie with anchovies, and was amazing. The sauce was very "harsh" just like the waiter said, but I loved it. Most people may not share this love, but I love anchovies. I enjoyed every bite of that dinner. I knew during my trip I would come across dishes I would want to recreate. This was a perfect contender. It was amazing, but simple. I was fairly certain the sauce contained olive oil, onions, and anchovies. That is it. I will never know if I am correct or not. After attempting to recreate this dish, I wouldn't be surprised if I was right. I added a little healthy flare to the dish but it was still delicious. Not quite as rich as the Venician variety but I was okay with that. The recipe is very vague as it was over a week ago and I didn't really measure anything when I was cooking. But, I did use these two items in the dish, both brought back from Cinque Terre.


Trofie con le Acciughe
serves 3

~3 tbsp olive oil (be generous)
1/3 cup onion chopped into ~2 cm pieces
anchovies (according to your taste, I added maybe 1/4 of the jar)
2 cups finely chopped Kale
spinach trofie pasta

1. Cook pasta according to package instructions. I used a bag of dried pasta I purchased in Cinque Terre. Any type of pasta would work here. I think linguini or rotini would be nice.
2. Head olive oil on medium and then add onions. Saute until about half cooked.
3. Add anchovies and stir while sauteing for ~5 minutes. Once the anchovies have disolved into the sauce that is forming, add the kale. Stir until kale is cooked and wilted.
4. Turn heat to low and add the pasta. Add enough so you reach the ratio of pasta to sauce you like.
5. Serve hot.


I absolutely loved this pasta dish, probably the best I have ever made. You definitely need to be generous with the oil, as I attempted making this sauce again with less, and it just wasn't as good. The oil helps the anchovies dissolve into the sauce and give it a nice even consistency (note that you can't see any anchovies in the picture). The sauce was also a little less 'anchovie-y' than the version I had in Italy. I could have gone for some more. My Dad said it was really good, and said to me afterwards, "I knew there was a reason we let you live here." Even my Mom who doesn't really care for anchovies liked it! There is a misconception that anchovies taste very fishy, but that is only if you pop a whole fillet in your mouth. When part of a dish such as this one, they really just add some salt and a unique flavour. You can add 1 or 10, and you will get more or less of that flavour. I encourage all of you anchovy haters out there who have never tried anchovies to give this recipe a shot, starting out with just one fillet. I have a feeling you will be adding more of them in no time. And if you are like me and love anchovies, you MUST try this recipe adding as many fillets as your heart desires.

Thursday, September 1, 2011

Arrivederci Italia

Did you miss me? I have definitely missed writing the blog. I haven't cooked in 3 weeks and I am excited to get back in the kitchen. I have been home for a few days now and am pretty much unpacked from the move back into my parent's house. I think by next week you can expect a new recipe or two.

To tide you over until then, I thought I would show you a few highlights from the trip. They are in no particular order.  Blogger photo uploader drives me crazy.

This was my favourite photo from Venice. I really liked this area of Venice (Dorsoduro) as it was quiet and more quaint. There are also better restaurants outside of San Marco.

The three nights in Venice resulted in 1 really bad expensive dinner, 1 good dinner, and 1 dinner that was phenomenal and worth mentioning. It was at this very small restaurant near the rialto bridge. It was fairly hard to find but well worth it. It is also important to make a reservation or you will not get a table. At this restaurant I had linguini with anchovies and it was the most memorable restaurant meal for me in Italy. Expect a recipe soon, if I succeed at recreating it that is..

In case you were thinking it, yes I ate meat and seafood in Italy. My desire to sample authentic food trumped by desire to eliminate my meat consumption. I am very glad I did as I did not have to turn down food made for me by my family, and I was able to try some really delicious food. The vegetarian options on menus are few and far between. I am also glad I decided to eat seafood because in Cinque Terre, I had the best seafood I had ever had. Our first night there we went to Ciak. We were very hungry from travelling from Venice and this was the first place we saw. It looked busy and the food looked delicious. We ordered a seafood risotto. It came in this big ceramic pot which is cooked from a flame from below. It was absolutely amazing, and comes in a close 2nd for my favourite restaurant meal during the trip. The chef can be seen every day hanging out outside the restaurant, and preparing food for the evenings dinner. A window from the street looks directly into the kitchen and dining room, which draws many curious people to stop and take a look. This restaurant is a bit pricey but is worth it at least once if you are spending time in Monterosso Cinque Terre. They also do not carry any house wine and the bottles are expensive. Skip the wine and save room for the sea food. Check out their website for information and their history.

I would like to point out that the seafood risotto and the pasta with anchovies were my favourite restaurant meals in Italy. I say this because for the first 4 days I was staying with my Grandfather's sister and her husband in Pescara, and she made us many fantastic home made meals. Upon our arrival she has fresh homemade pasta made with eggs from these chickens you see here. It was amazing pasta with such fresh homemade sauce. We also were able to sample the freshness of the eggs by simply having fried eggs one night for dinner. This may sound crazy to some, but they were the best eggs I have ever had. I had never had a fresher egg. The yolk was so much creamier and delicious.  It might be due to their rather unconventional diet (keep reading). We got to visit the chickens one day in the small town where my Grandfather was born. The house is now under the care of my Great Aunt and Uncle. They have fixed up the house and they maintain a large garden and chicken coop. The chickens get fed whatever food is laying around. While we were there, they feasted on some pasta with tomato sauce, and the watermelon (pictured below). After deciding the watermelon was not fit for human consumption, it was subsequently dropped off the kitchen balcony into the chicken coop (one story below) by my Aunt, resulting in a splatter of watermelon, happy chickens, and a quiet laugh from my Aunt. I will miss my Zia Cesira until my next trip to Italy.

Also during our visit to the house, I walked around the garden with my Nonna and Aunt picking any ripe vegetables and admiring what was to come. I had my camera with me and my Nonna made me take a picture of these tomatoes. I am glad she did.

This is my Zio Nunzio taking care of the garden. He takes a 45 minute drive every day to care for the garden and the house. His hard work sure pays off!

Now this isn't food related but it was my favourite sight in Rome. I didn't manage to get a good picture of the Trevi Fountain, but the sight blew me away. I guess I didn't realize the size the fountain would be. When the slender street leading to the fountain opened up into the Piazza, I was surprised. The fountain was large, dynamic, and vibrant and I knew immediately that I loved it. It was very busy so it was hard to soak it in, but I could have sat by the the fountain for hours.

Oh the gelato. I had gelato almost every day in Italy. It is almost neccessary. It makes a perfect afternoon snack to tide you over until dinner which is always late, and cools you off from the afternoon heat. I usually got a 'piccoli' size cup and sometimes in a cone, but this particular day where this photo was from I was feeling a bit more adventurous. It was actually my favourite gelato of the trip. The flavour you see is stracciatella which is just a milk gelato with chocolate pieces. It was my go-to flavour. What you don't see is a venetian cream stracciatella below the regular straciatella. This flavour was to die for. Most likely due to added cream or vanilla. It was more rich than the other flavours I had tried and was a welcomed change. In case you are wondering, yes, I am currently in gelato withdrawal.

In both Rome and Venice, we tried to visit a market to get some fresh fruit to have for snacks. This photo is from the Rialto market in Venice. It was a Sunday so there wasn't too much at the market but I thought these peperoncinni were beautiful. We went home with nectarines, bananas, plums, figs, zucchini and tomatoes. Since Venice was rather expensive to eat out in comparison to Rome, we decided to make our own lunches as well as breakfasts during our stay (we stayed in an apartment with a kitchen). After purchasing some fresh buns, mozzarella, and prosciutto we had all we needed.

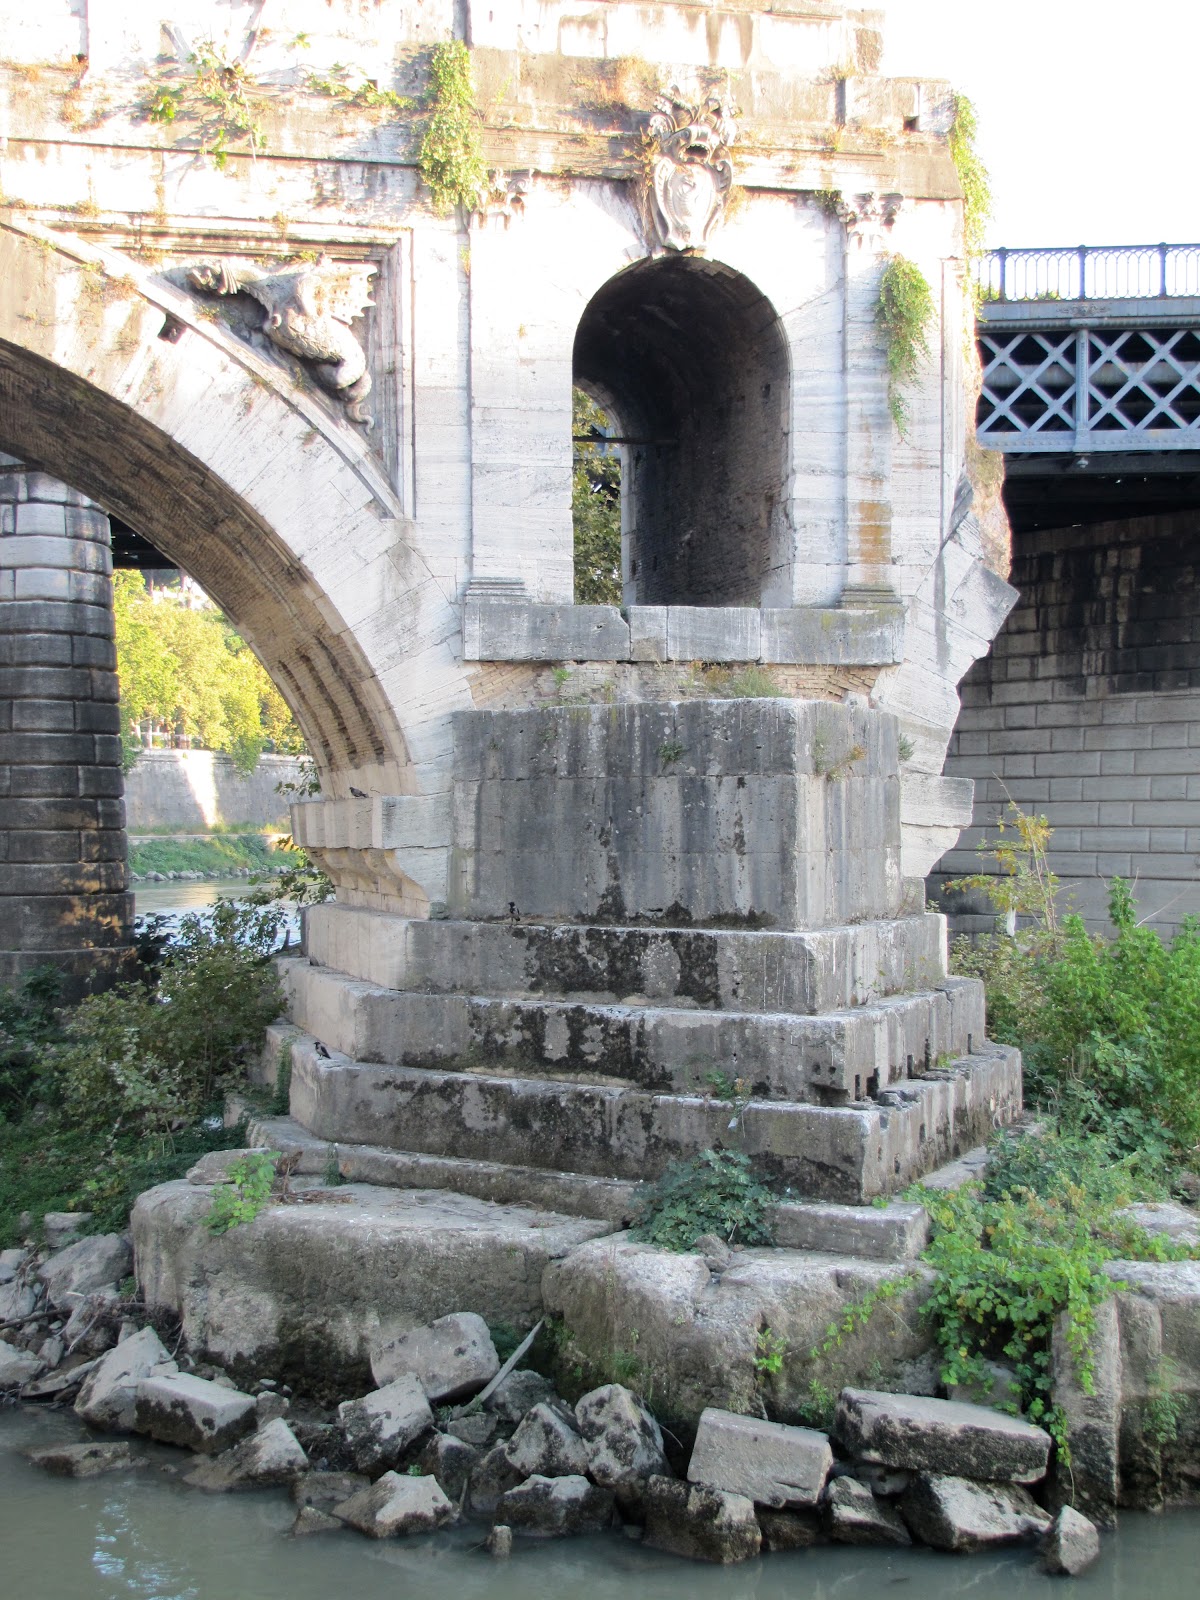
This is a photo of a portion of the Pons Aemilius bridge over the Tiber river which flows through Rome. It is right alongside a much newer bridge, Ponte Palatino. This bridge portion is now called Ponte Rotto and is the oldest bridge in Rome. It was build in the second century BC. It is amazing that even this portion has withstood the last 2000+ years.

In Rome we stayed right in Campo dei Fiori. It was a great location to stay as it is central to most attractions in Rome. Here we are enjoying a cafe latte at one of the restaurants overlooking the market at work. My Nonna lived in Campo dei Fiori in her teenage years and it was great to hear about her memories of this market. The market has shifted over the last 50 years. It used to be a spot for fresh fish, fruit, meat, vegetables, eggs etc. Now it is mostly fruit/veggies and some specialty foods mostly geared to tourists. Regardless, it still has some charm. There is also a great deli along the border of the market where we used to get sandwiches for breakfast.

Well, I hope you enjoyed those few photos and a small sample of my experience during my trip. Like I said, I hope to share a recipe soon. I purchased some food items in Cinque Terre and I hope to use them to recreate some of the dishes I had in Italy.

Thursday, August 11, 2011

Cinnamon Spiked Chickpea Flour Breakfast Bars

This recipe is the result of a friend looking out for me. My Housemate and good friend Jenna, knew I was on the hunt for a delicious use for my chickpea flour. While I have had one success, it has been mostly failures. On Sunday, she sent me a link to a recipe on the Edible Perspective. It was for a gluten-free "bread." I knew immediately I wanted to make it and made it later on that day.

I made minor tweaks mostly due to what I had on hand. The original recipe was gluten-free, but with my wheat bran addition these are no longer gluten-free. The texture resonated with me as more of a "bar" so that is what I am calling it.

Cinnamon Spiked Chickpea Flour Breakfast Bars slightly adapted from the Edible Perspective

3/4 cup chickpea flour
1/2 cup oat flour
1/8 tsp salt
1 tbsp brown sugar
2 tsp cinnamon
2 tbsp olive oil
1/6 cup chopped dates
1/6 cup white chocolate chips
1/4 cup unsweetened coconut
1/4 cup wheat bran
1 cup water

1. Preheat oven to 375 degrees F.
2. Combine all ingredients in order and stir to combine.
3. Pour into a well greased 9x9 pan
4. Bake for 35-45 minutes until crackers and browned on the edges.


These seemed a bit more crumbly than those from the Edible Perspective, but I'm sure it has to do with the bran addition, or the olive oil substitution for coconut oil. I have to get my hands on some of that stuff.

I was a bit hesitant to replace the buckwheat flour (which I didn't have) with more chickpea flour as I thought I would find the chickpea flavour overbearing. I also wanted to make sure it was sweet enough for me based on my past experiences with chickpea flour. That is why I made sure to replace the dried fruit I didn't have with some chocolate chips. On my first bite I wasn't too sure but it really grew on me. It is great with peanut butter on top, and made a great quick breakfast for this busy week. Also, do not be shy with the cinnamon! I am happy to report, that with this recipe, I polished off 2 mason jars of pantry items! Again, it felt like checking off items on a to do list.

This will be my last post before I head off to Italy. I will not be blogging during my trip. Upon my return I will be finishing my move back into my parent's house, but hopefully I will be able to bring you a new post with a new recipe shortly after my return. While I won't be blogging, I will be tweeting, so you can follow me @foodforfuel to keep up to date!

See you in September! (wow, already?!?)

Monday, August 8, 2011

Steel Cut Oats with Dates

Those of you who follow me on twitter, or who follow me in real life, a.k.a. real-life friends/family, know this is a big week! I am working on my research study for my thesis (will be half done data collection after this week), am moving home for a year (I haven't lived at home for more than a few months in 6 years), and am heading to Italy on Friday (I have never been across the ocean).  I have been preparing for a while. Slowly moving some things home, packing here and there, planning for the trip, etc. etc. I have also been trying to reduce some of my pantry and freezer stocks. This has caused me to be a bit more creative as well as reduce my grocery lists. I have also had some help from my parent's garden for supplying me with fresh veggies.

While this week is all about quick breakfasts since I need to be at school by 6 am most days, I had some leisurely mornings last week. This allowed me to cook up the rest of the steel cut oats I had laying around. I also managed to use up a few dates in the process.

Steel Cut Oats with Dates

1 1/2 cups water
1/2 cup steel cut oats
4 small dates, chopped

1. Bring water to a boil. Add oats and stir.
2. Bring back to a boil and reduce to a simmer.
3. When the oats are 1/2 done (5-8 min) add the dates and stir in.
4. Continue to simmer until desired consistency is reached.

These oats were the perfect sweetness for me. I rarely sweeten my hot oats, and usually just top it with a dollop of peanut butter, so this was a treat! It was the perfect amount of sweetness as it was subtle and throughout the oats, due to cooking the oats with the dates. Even with the dates, I still topped it with some peanut butter. It's my favourite.


I made this a couple times and in this picture I used steel cut with some rolled oats since I didn't have enough of each. I finished off two canisters on this breakfast. To me, emptying canisters feels like checking off an item on a to do list. Call me crazy!

I will have at least one more recipe before the end of the week. Todays post is about leisurely breakfasts, but the next one will be a breakfast recipe for those rushed mornings. Stay tuned!

Monday, August 1, 2011

Tomato, Walnut and Basil Sauce on Raw Zucchini Pasta

The garden is booming! My parent's garden that is. My little planters on my patio have yielded 0 fruit, and it will stay that way unfortunately. There was a lonely little pepper growing a few days ago, but it looks like the neighbourhood animals beat me to it. Oh well, it was worth a try. At least I have access to my parent's and grandparent's garden this time of year. Every weekend I have been coming home with lettuce, kale, swiss chard, and radishes. Yesterday, I came home with the first of the tomatoes, zucchini, cucumber, green pepper and chili pepper.

I wanted to make a dish that was light, raw, and would really highlight the freshness of the veggies. I have made raw zucchini pasta in the past, but wasn't a huge fan. Since I don't have a mandoline, the zucchini was irregular shaped and not as thin as it should have been. I also didn't have the right kind of sauce for it. With the though of gazpacho in mind I remembered this recipe, which is where I originally saw 'raw pasta'.  I made a few changes and it turned out wonderful. Extremely flavourful and perfect for these hot summer days we have been having.

Tomato, Walnut and Basil Sauce on Raw Zucchini Pasta adapted from Mis Pensamientos

1/2 cup walnuts
1 handful of basil
1/2 tsp parsley
1/4 large onion
juice of 1 lemon
1 tbsp olive oil
2 garlic cloves, chopped
2 cups chopped tomatoes
2 zucchini

1. Add walnuts to food processor and pulse until finely chopped.
2. Add basil, parsley, onion, lemon, olive oil and garlic. Process until a pesto forms, scraping down the sides as neccesary.
3. Add tomatoes and pulse until combined (I only pulsed 3 times). Drain any excess liquid.
4. Use a mandoline to thinly peel the zucchini, or use a peeler to make the 'zucchini pasta'. Top with the pesto sauce.


After taking a look at this photo I realized the sauce doesn't look too appetizing, but I can assure you it tastes wonderful. I almost added some chili peppers but I am glad I didn't because it already has quite the bite from the basil and garlic. I also would have topped this with some goat cheese if I had some on hand. that bowl is 1 small zucchini and about 1/3 of the sauce. I think the leftover sauce would be wonderful in a cold pasta or quinoa salad.

**Update: Zucchini pasta is not for everyone. I really don't find raw zucchini all that appetizing, I much prefer it cooked. Maybe I would like it better if I had a spiralizer? As I was eating this for lunch I really wished I had real pasta, or cooked zucchini at least. Maybe some cheese would have made it better. Anyway, definitely give zucchini pasta a try at least once, but if it isn't your thing, I don't blame you, but don't forget about the tomato, walnut and basil sauce...it goes nicely with lots of other things.

I hope everyone had a great long weekend. Mine was low key and fairly relaxing. I spent some time with my family and made more preparations for moving into my parent's house, and for my trip to Italy. It is becoming more of a reality that I will be moving out of my current house and leaving my awesome housemates :(

I will leave you with a picture I took today of Tew's Falls in Hamilton.

Friday, July 22, 2011

Kale and Pasta Salad with Balsamic Vinaigrette

How is everyone handling the heat? I am handling it okay, but only because of the decision to finally turn the air conditioner on in our house. I am unsure if it has turned off since the heat wave began. That should be fun when the bill comes around! With all the heat, it is hard to get motivated to cook. Yesterday I made the mistake of making tea (to ultimately chill it), kale chips, and veggie burgers. The kitchen was a HOT MESS! Literally though, I spilt tea everywhere at one point. Luckily, I had an amazing lunch which was nice and cold. A kale and pasta salad with balsamic vinaigrette.

The salad came together rather quietly. It was the result of a series of fortunate events.

1. First it was just a container of leftover pasta. Maybe I will eat it with some pesto? Maybe I will just eat it cold straight from the fridge if I get THAT hungry?

2. But, when I was making a salad for dinner Wednesday night I saw the kale I had from my parent's garden. "Let's just throw that in there!" I said. So I did.

3. As I was chopping up some cucumber (from my Grandfather's garden) for the dinner salad, I had some extra. "Let's just toss that in the leftover pasta container too."

4. Kale is best raw when it has been in some dressing at least a few hours. Well, I was already dressing a salad, "why don't I just pour some of it on the pasta too?"

5. In the morning, I threw in some orange tomatoes, some goat cheese, and called it a day. A great day that is...because of this salad of course.

Kale and Pasta Salad with Balsamic Vinaigrette

farfelle pasta, cooked (penne, Conchiglie or rotini would also work well)
kale
tomato
cucumber
zesty balsamic vinaigrette
crumbled coat cheese

1. Toss together (everything except goat cheese and tomato), the night before. Refrigerate overnight.
2. Add tomato, goat cheese, and serve.


When I opened up the container for lunch I was so excited, and also very hungry. It looked so beautiful and vibrant that I had to take the 10 second to take a picture with my phone. I think it captures the colour rather well! The salad was really good and very filling. Be sure to use whole wheat pasta to get the same effect ; )

By the way, you should really check out this link. Deciding what pastas would work well led me to that wikipedia page. So many pasta types! I think I better brush up on my Italian pasta vocabulary!

Monday, July 18, 2011

Overnight Oats with Cottage Cheese

I have been back on an overnight oats kick lately. I hadn't had them in a while until a couple weeks ago. I rekindled my love for them inspired by this recipe by the Healthy Foodie. I made some changes, but it got me hooked again. I have also seen some recipes for overnight oats out there using cottage cheese. Before I left for the weekend I wanted to use up the last bit of cottage cheese I had in the fridge, so I thought, what better time to give it a try. I love cottage cheese but only recently (last few months) have enjoyed it in a sweet state. I used to only enjoy it on pasta, or salads, on its own, or maybe with some nuts. But now, I like it with sliced strawberries or nectarines. Yum.

I started out with my usual standard overnight oats recipe, and substituted 1/2 cup of the soy milk for almost 1/2 cup of 2% cottage cheese. I absolutely loved the modification. I was quite full so I think next time I would scale it down, but it sure did pack a protein punch, 27 grams to be exact. Woah.

Overnight Oats with Cottage Cheese

1/2 cup oats
1 tbsp ground flax (or chia seeds)
1 small banana, chopped
1/2 cup unsweetened soy milk
1/2 cup 2% cottage cheese

1. Chop banana into bottom of bowl.
2. Add oats and flax on top of banana.
3. Add soy milk and cottage cheese.
4. Mix, trying to keep the banana on the bottom (prevents browning).
5. Chill overnight (or for a few hours).

It was just the right about of cheesiness. It was a bit thick in the morning so I added a dash of milk until it was the consistency I like. I also added a little bit of almond butter (peanut butter would be good too).  Like I said, I would probably scale it down to 1/3 cup oats next time because I was too full after eating it all.

Overnight oats are a great breakfast for the summer because they are quick, cold, and require no cooking. There is so much potential for this kind of breakfast. Let your imagination run wild!

....And then come back here and let me know what you come up with!

Thursday, July 14, 2011

Chickpea and Kale Multigrain Pizza

I have shared before how making pizza on the BBQ is awesome. It gets the crust nice and crusty, which sometimes doesn't happen in the oven. Plus, it is the summer and I'd rather cook outside on the BBQ than assist in making this house of mine any hotter. I have been wanting to make my own pizza dough for a while now, so I finally did. I made a batch of this recipe by Eat, Live, Run. The only change I made to Jenna's recipe was substituting a 12 grain flour instead of the whole wheat. This substitution made the dough a little more tough and it didn't rise quite as much, but it was still delicious.

I divided the dough after rising into 4 balls and put them in the freezer. Each one makes a small pizza which serves two.  With the doughs I have made 3 different kinds of pizza. I brought along some dough to the cottage and made classic veggie pizzas with tomato sauce, cheese, peppers, and mushrooms. Nothing too out of the ordinary.

The next was a veggie heavy pizza. I topped it with some mozzarella, cooked spinach (previously frozen in nuggets), and tomato slices. It was actually REALLY good. I have never put spinach on my own pizza before, but I loved the mozzarella and spinach combination.


The next pizza I made without having quite as many ingredients on hand. I had some leftover sauce still, but that was about the only "normal" pizza topping I used. After the sauce I plopped on some cottage cheese, chickpeas, dukkah, and kale. I could have gone without the dukkah truthfully, but chickpeas and dukkah go hand in hand. 


The first time I had kale on pizza was at Earth to Table Bread Bar on Locke St. in Hamilton. The pizza also had olives on it and it was a winning combination. The kale got really crispy, which was welcomed, but was lacking some moisture. I think the oven method would have gotten the desired effect in this case. Either way, still a good pizza, and definitely not ordinary.

The fact that I have no more dough left makes me sad. I will probably make some more soon because it makes for a pretty quick dinner. Even with nothing else on hand, simply olive oil and spices is really all it takes to make a good pizza. I wonder how it will compare to the pizza in Italy? Probably won't come close but I can't wait to find out!

Friday, July 8, 2011

Banana Chocolate Chip Chickpea Flour Pancakes

In about 5 weeks, I will have completed part of my research study for my Master's thesis, move out of my current house and into my parent's house, and depart for Italy for a 2 week trip with my Nonna and cousin. I am really excited for it all to happen, but I feel like a lot needs to happen in the next 5 weeks. One thing that needs to happen is that I need to use up a lot of my pantry and freezer items. This will not only make my move easier, but I will reduce the risk of wasting food and I will save some money. I am going to start making the conscious effort to use up what I have and attempt to make-due rather than taking those oh so tempting grocery trips.

What have I done in the past few days to accomplish this:

1. I made some granola. I made a version similar to the crunchy quinoa granola, but I added some oats and different nuts.
I have lots of yogurt in the fridge that needs to get eaten in the next week or two. Normally I add some fruit and I am good to go. However, I want to save some of those frozen berries for in the future when I may not have any fresh fruit available to me. Plain yogurt is a bit boring on it's own however so I made this high protein and fairly low sugar granola. It also used up lots of nuts that I had as well as some dried cranberries which I will not eat on their own.

2. Used up that big bag of frozen vegetable scraps.
For the past few months, I had been keeping some veggie scraps in a ziploc bag in the freezer. It had a little bit of everything. I kept aspargus ends, parsnip tops, carrot peelings, bruised zucchini, mushroom stems, and wilted celery. I had been doing this since I wrote this post on wasting less food, but I have not kept everything. I figured it was about time to make the vegetable stock I was keeping these veggies for. Soup is literally the last thing I would want to be making this time of year, but it had to be done. I will write about making vegetable stock in the near future, and what I end up using it for.

3. Developed a yummy pancake recipe using chickpea flour.
Once my oats run out, pancakes are the next order of business for breakfast, which will also help with using up some flour. However, I'd like to save my wheat flour for baking bread, and I have a lot of chickpea flour to play with. I wanted to figure out a good recipe that is quick and also delicious. After first trying chickpea pancakes with blueberries, I knew I needed to up the sweet factor if I was going to enjoy them for breakfast. My first try was a great success and after one more tweak I have settled on the following recipe.

Banana Chocolate Chip Chickpea Flour Pancakes
serves 1

1/2 cup chickpea flour
1 tsp baking powder
1 tsp cinnamon
1/2 cup vanilla soy milk (I think the sweetened soy milk might be neccessary)
1 banana, chopped
1 tbsp dark chocolate chips - an extra tbsp doesn't hurt ;)

1. Whisk together the first three ingredients.
2. Slowly add the soy milk, whisking in to remove any clumps.
3. Stir in the banana and chocolate chips.
4. Heat a greased pan on medium heat, and add 1/4 of the batter to the pan (I like to cover the pan). Once the bubbles no longer close up, it is time to flip the pancake. After 2 minutes or so the pancake should be about done.
5. I eat them plain or with a bit of almond butter on top.


These pancakes are really good, especially the bites which have lots of banana and chocolate. I have a feeling the use of the chickpea flour is an acquired taste, and definitely needs to be sweetened to be used as a pancake flour. I have been having these for breakfast for the past few days and have really been enjoying them. It is a great way to use up my chickpea flour as well as some frozen bananas kicking around. If you don't like banana, adding a tbsp or two of coconut is also good.